Love Cats 3D Shadow Box
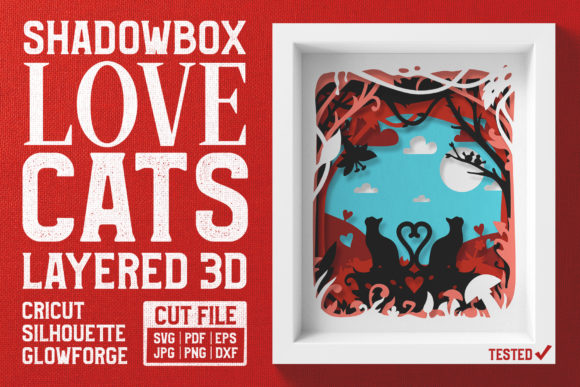
Crafting is often about more than just assembling parts; it is about creating depth, dimension, and emotion in a physical object. The Love Cats 3D Layered Shadow Box SVG Cut File offers a unique opportunity to transform simple materials into a stunning piece of art. This design features two cats forming a heart with their tails, set against a futuristic landscape populated by trees, plants, mushrooms, and flowers. It is a versatile digital asset that works beautifully for Valentine’s Day projects, romantic decor, or even as a whimsical addition to a Christmas shadowbox or lightbox.
However, achieving the intended three-dimensional effect requires more than just cutting out shapes. Many creators rush through the assembly process, resulting in a flat product that fails to capture the magic of the original design. Understanding the mechanics behind layered paper crafts is essential for anyone looking to produce professional-quality results. This guide explores how to properly utilize this file, common pitfalls to avoid, and best practices for materials and assembly.
Understanding the Design Concept
The core appeal of the Love Cats 3D Shadow Box lies in its narrative composition. The silhouette of the cats is not merely decorative; it serves as the focal point around which the intricate background elements are arranged. The futuristic landscape provides contrast, allowing the organic shapes of the flora—such as mushrooms and flowers—to pop visually. When executed correctly, this layering creates a sense of movement and space, drawing the viewer’s eye from the foreground couple to the detailed environment behind them.
This design is compatible with a wide range of crafting techniques. Whether you are using heavy cardstock, thin paper, or even plywood for a more permanent installation, the underlying structure remains the same: distinct layers stacked to create volume. For those interested in holiday themes, swapping traditional reds and greens for silver, blue, or white palettes can easily turn this romantic scene into a festive winter wonderland display.
Common Mistakes in Assembly
One of the most frequent errors seen in community craft forums is the misuse of adhesives. Creators often apply glue directly between every layer to hold everything in place. While this might seem like the quickest method, it fundamentally undermines the purpose of a 3D shadow box. Glue tends to flatten the layers, eliminating the air gap necessary for depth. Furthermore, excess glue can seep through paper fibers, causing discoloration or warping, which ruins the clean aesthetic of the artwork.
Another common misunderstanding involves the order of operations. Some users attempt to cut all layers at once without verifying the sequence. If the layers are stacked incorrectly, the visual hierarchy collapses. For instance, placing a background element like a distant tree in front of a foreground mushroom will distort the perspective, making the image look disjointed rather than immersive. Always consult the provided guide to ensure each layer is positioned according to the intended depth map.
Material selection is also a critical area where beginners often stumble. Using paper that is too thin for larger structural layers can lead to sagging or tearing, especially when multiple spacers are involved. Conversely, using wood that is too thick can make the final shadow box excessively bulky, requiring a much deeper frame than originally planned. Balancing material weight with the desired level of detail is key to a successful finish.
Best Practices for Materials and Tools
To achieve the high-quality finish promised by the Love Cats 3D Shadow Box design, start with the right tools. A precision cutting machine is highly recommended over manual scissors or craft knives. Laser cutters or electronic cutters like Cricut or Silhouette provide the clean edges needed for intricate details like cat whiskers or flower petals. Rough edges can catch on adjacent layers, causing misalignment during assembly.
When selecting your base material, consider the end use of the project. For lightweight, temporary displays, standard cardstock (around 80–110 lb) works well. For heirloom pieces or outdoor lightboxes, consider using acrylic sheets or laser-cut plywood. If you choose wood or acrylic, remember that these materials require different spacing solutions than paper. Wood spacers or thicker foam tape are necessary to accommodate the rigidity of these substrates.
For cardstock projects, double-sided foam dots or adhesive tabs are your best friends. These small, round adhesives provide consistent height between layers. They allow you to control exactly how much "pop" each section has. Experiment with different heights; using taller foam dots for the central cats and shorter ones for the background foliage can enhance the sense of depth, guiding the viewer’s focus naturally toward the heart shape formed by the tails.
Step-by-Step Assembly Guidance
- Download and Organize: Save the digital file to your computer and open it in your preferred vector software. Verify that all layers are named and separated correctly before sending them to the cutter.
- Cutting: Cut each layer individually if possible, or use a multi-layer cutting mat technique to ensure consistency. Label each cut piece immediately to prevent confusion later.
- Preparation: Prepare your spacers. If using foam dots, peel off the backing only when you are ready to adhere a specific layer. Keep a pile of pre-cut spacers ready to speed up the process.
- Stacking: Begin with the back layer (usually the deepest background). Apply spacers to the corners and center of this layer. Place the next layer on top, aligning carefully. Continue stacking, working from the background to the foreground.
- Final Assembly: Once all layers are stacked, check the alignment. Ensure the cats and the heart shape are centered and visible. Secure the entire stack into your shadow box frame or lightbox housing.
Evaluating Your Final Product
After assembly, step back and view your creation under different lighting conditions. A shadow box benefits greatly from directional light, which casts subtle shadows that emphasize the layers. If you are using a lightbox, ensure the LEDs are evenly distributed to avoid hot spots that might wash out the details of the futuristic landscape.
If the result feels flat, do not despair. You can often disassemble and re-stack with additional spacers. The beauty of this modular design is its flexibility. Adjusting the height of individual layers can significantly alter the mood and impact of the piece. Remember, the goal is not just to assemble a picture, but to build a miniature world that invites inspection.
Conclusion
The Love Cats 3D Shadow Box is more than just a cute design; it is a project that rewards patience and attention to detail. By avoiding common mistakes like gluing layers flat or ignoring material properties, you can create a truly impressive work of art. Whether you are a seasoned crafter looking for a new challenge or a beginner eager to try your hand at 3D paper engineering, this file offers a rewarding experience. Take your time, choose quality materials, and let the layers come together to form something beautiful.